Node.js
Things that are specific to Node.js. Note that things about Javascript in general, are found under their own "Javascript" chapter!
- How to install Node.js applications, if you're not a Node.js developer
- Getting started with Node.js
- Node.js for PHP developers
- Rendering pages server-side with Express (and Pug)
- Running a Node.js application using nvm as a systemd service
- Persistent state in Node.js
- node-gyp requirements
- Introduction to sessions
- Secure random values
- Checking file existence asynchronously
- Fixing "Buffer without new" deprecation warnings
- Why you shouldn't use Sails.js
- Building desktop applications with Node.js
- lmdb-js Quick Reference
- Fixing node: prefixed requires/imports in Browserify
How to install Node.js applications, if you're not a Node.js developer
This article was originally published at https://gist.github.com/joepie91/24f4e70174d10325a9af743a381d5ec6.
While installing a Node.js application isn't difficult in principle, it may still be confusing if you're not used to how the Node.js ecosystem works. This post will tell you how to get the application going, what to expect, and what to do if it doesn't work.
Occasionally an application may have custom installation steps, such as installing special system-wide dependencies; in those cases, you'll want to have a look at the install documentation of the application itself as well. However, most of the time it's safe to assume that the instructions below will work fine.
If the application you want to install is available in your distribution's repositories, then install it through there instead and skip this entire guide; your distribution's package manager will take care of all the dependencies.
Checklist
Before installing a Node.js application, check the following things:
- You're running a maintained version of Node.js. You can find a list of current maintained versions here. For minimal upgrade headaches, ensure that you're running an LTS version. If your system is running an unsupported version, you should install Node.js from the Nodesource repositories instead.
- Your version of Node.js is a standard one. In particular Debian and some Debian-based distributions have a habit of modifying the way Node.js works, leading to a lot of things breaking. Try running
node --version- if that works, you're running a standard-enough version. If you can only donodejs --version, you should install Node.js from the Nodesource repositories instead. - You have build tools installed. In particular, you'll want to make sure that
make,pkgconfig, GCC and Python exist on your system. If you don't have build tools or you're unsure, you'll want to install a package likebuild-essential(on Linux) or look here for further instructions (on other platforms, or unusual Linux distributions). - npm works. Run
npm --versionto check this. If thenpmcommand doesn't exist, your distribution is probably shipping a weird non-standard version of Node.js; use the Nodesource repositories instead. Do not install npm as a separate package, this will lead to headaches down the road.
No root/administrator access, no repositories exist for your distro, can't change your system-wide Node.js version, need a really specific Node.js version to make the application work, or have some other sort of edge case? Then nvm can be a useful solution, although keep in mind that it will not automatically update your Node.js installation.
How packages work in Node.js
Packages work a little differently in Node.js from most languages and distributions. In particular, dependencies are not installed system-wide. Every project has its own (nested) set of dependencies. This solves a lot of package management problems, but it can take a little getting used to if you're used to other systems.
In practice, this means that you should almost always do a regular npm install - that is, installing the dependencies locally into the project. The only time you need to do a 'global installation' (using npm install -g packagename) is when you're installing an application that is itself published on npm, and you want it to be available globally on your system.
This also means that you should not run npm as root by default. This is a really important thing to internalize, or you'll run into trouble down the line.
To recap:
- Run npm under your own, unprivileged user - unless instructions specifically state that you should run it as root.
- Run npm in 'local' mode, installing dependencies into the project folder - unless instructions specifically state that you should do a global installation.
If you're curious about the details of packages in Node.js, here is a developer-focused article about them.
Installing an application from the npm registry
Is the application published on the npm registry, ie. does it have a page on npmjs.org? Great! That means that installation is a single command.
If you've installed Node.js through your distribution's package manager: sudo npm install -g packagename, where packagename is the name of the package on npm.
If you've installed Node.js through nvm or a similar tool: npm install -g packagename, where packagename is the name of the package on npm.
You'll notice that you need to run the command as root (eg. through sudo) when installing Node.js through your distribution's package manager, but not when installing it through nvm.
This is because by default, Node.js will use a system-wide folder for globally installed packages; but under nvm, your entire Node.js installation exists in a subdirectory of your unprivileged user's home directory - including the 'global packages' folder.
After following these steps, some new binaries will probably be available for you to use system-wide. If the application's documentation doesn't tell you what binaries are available, then you should find its code repository, and look at the "bin" key in its package.json; that will contain a list of all the binaries it provides. Running them with --help will probably give you documentation.
You're done!
If you run into a problem: Scroll down to the 'troubleshooting' section.
Installing an application from a repository
Some applications are not published to the npm registry, and instead you're expected to install it from the code (eg. Git) repository. In those cases, start by looking at the application's install instructions to see if there are special requirements for cloning the repository, like eg. checking out submodules.
If there are no special instructions, then a simple git clone http://example.com/path/to/repository should work, replacing the URL with the cloning URL of the repository.
Making it available globally (like when installing from the npm registry)
Enter the cloned folder, and then run:
- If you installed Node.js from your distribution's repositories:
sudo npm install -g, with no other arguments. - If you installed Node.js through
nvmor a similar tool:npm install -g, with no other arguments.
You're done!
If you run into a problem: Scroll down to the 'troubleshooting' section.
Keeping it in the repository
Sometimes you don't want to really install the application onto your system, but you rather just want to get it running locally from the repository.
In that case, enter the cloned folder, and run: npm install, with no other arguments.
You're done!
If you run into a problem: Scroll down to the 'troubleshooting' section.
Troubleshooting
Sometimes, things still won't work. In most cases it'll be a matter of missing some sort of undocumented external dependency, ie. a dependency that npm can't manage for you and that's typically provided by the OS. Sometimes it's a version compatibility issue. Occasionally applications are just outright broken.
When running into trouble with npm, try entering your installation output into this tool first. It's able to (fully automatically!) recognize the most common issues that people tend to run into with npm.
If the tool can't find your issue and it still doesn't work, then drop by the IRC channel (#Node.js on Libera, an online chat can be found here) and we'll be happy to help you get things going! You do need to register your username to talk in the channel; you can get help with this in the #libera channel.
Getting started with Node.js
This article was originally published at https://gist.github.com/joepie91/95ed77b71790442b7e61. Some of the links in it still point to Gists that I have written; these will be moved over and relinked in due time.
Some of the suggestions on this page have become outdated, and better alternatives are available nowadays. However, the suggestions listed here should still work today as they did when this article was originally written. You do not need to update things to new approaches, and sometimes the newer approaches actually aren't better either, they can even be worse!
"How do I get started with Node?" is a commonly heard question in #Node.js. This gist is an attempt to compile some of the answers to that question. It's a perpetual work-in-progress.
And if this list didn't quite answer your questions, I'm available for tutoring and code review! A donation is also welcome :)
Setting expectations
Before you get started learning about JavaScript and Node.js, there's one very important article you need to read: Teach Yourself Programming in Ten Years.
Understand that it's going to take time to learn Node.js, just like it would take time to learn any other specialized topic - and that you're not going to learn effectively just by reading things, or following tutorials or courses. Get out there and build things! Experience is by far the most important part of learning, and shortcuts to this simply do not exist.
Avoid "bootcamps", courses, extensive books, and basically anything else that claims to teach you programming (or Node.js) in a single run. They all lie, and what they promise you simply isn't possible. That's also the reason this post is a list of resources, rather than a single book - they're references for when you need to learn about a certain topic at a certain point in time. Nothing more, nothing less.
There's also no such thing as a "definitive guide to Node.js", or a "perfect stack". Every project is going to have different requirements, that are best solved by different tools. There's no point in trying to learn everything upfront, because you can't know what you need to learn, until you actually need it.
In conclusion, the best way to get started with Node.js is to simply decide on a project you want to build, and start working on it. Start with the simplest possible implementation of it, and over time add bits and pieces to it, learning about those bits and pieces as you go. The links in this post will help you with that.
You'll find a table of contents for this page on your left.
Javascript refresher
Especially if you normally use a different language, or you only use Javascript occasionally, it's easy to misunderstand some of the aspects of the language.
These links will help you refresh your knowledge of JS, and make sure that you understand the OOP model correctly.
- A whirlwind tour of the language: http://learnxinyminutes.com/docs/javascript/
- Javascript is asynchronous, through using an 'event loop'. This video explains what an event loop is, and this video goes into more detail about how it works and how to deal with corner cases. If you're not familiar with the event loop yet, you should watch both.
- Javascript does automatic typecasting ("type conversion") in some cases. This shows how various values cast to a boolean, and this shows how
nullandundefinedrelate to each other. - In Javascript, braces are optional for single-line statements - however, you should always use them. This gist demonstrates why.
- Asynchronous execution in Javascript is normally implemented using CPS. This stands for "continuation-passing style", and this shows an example of how that works.
- However, in practice, you shouldn't use that, and you should use Promises instead. Whereas it is very easy to mess up CPS code, that is not an issue with Promises - error handling is much more reliable, for example. This guide should give you a decent introduction.
- A callback should be either consistently synchronous, or consistently asynchronous. You don't really have to worry about this when you're using Promises (as they ensure that this is consistent), but this article still has a good explanation of the reasons for this. A simpler example can be found here.
- Javascript does not have classes, and constructor functions are a bad idea. This short article will help you understand the prototypical OOP model that Javascript uses. This gist shows a brief example of what the
thisvariable refers to. Often you don't need inheritance at all - this gist shows an example of creating an object in the simplest possible way. - In Javascript, closures are everywhere, by default. This gist shows an example.
The Node.js platform
Node.js is not a language. Rather, it's a "runtime" that lets you run Javascript without a browser. It comes with some basic additions such as a TCP library - or rather, in Node.js-speak, a "TCP module" - that you need to write server applications.
- The easiest way to install Node.js on Linux and OS X, is to use
nvm. The instructions for that can be found here. Make sure you create adefaultalias (as explained in the documentation), if you want it to work like a 'normal' installation. - If you are using Windows: You can download an installer from the Node.js website. You should consider using a different operating system, though - Windows is generally rather poorly suited for software development outside of .NET. Things will be a lot easier if you use Linux or OS X.
- The package manager you'll use for Node.js, is called NPM. While it's very simple to use, it's not particularly well-documented. This article will give you an introduction to it.
- Don't hesitate to add dependencies, even small ones! Node.js and NPM are specifically designed to make this possible without running into issues, and you will get big benefits from doing so. This post explains more about that.
- The module system is very simple. The Node.js documentation explains this further.
- MongoDB is commonly recommended and used with Node.js. It is, however, extremely poorly designed - and you shouldn't use it. This article goes into more detail about why you shouldn't use it. If you're not sure what to use, use PostgreSQL.
- The rest of the documentation for all the modules included with Node.js, can be found here.
Setting up your environment
- To be able to install "native addons" (compiled C++ modules), you need to take some additional steps. If you are on Linux or OS X, you likely already have everything you need - however, on Windows you'll have to install a few additional pieces of software. The instructions for all of these platforms can be found here. Do not skip this step. Installing pure-Javascript modules is not always a viable solution, especially where it concerns cryptography-related modules such as
scryptorbcrypt. - If you're running into issues on Windows, try these instructions from Microsoft.
- There are a lot of build tools for helping you manage your code. It can get a bit confusing, though - there are a lot of articles that just tell you to combine a pile of different tools, without ever explaining what they're for. This is a hype-free overview of different kinds of build tools, and what they may be useful for.
Functional programming
Javascript has part of its roots in functional programming languages, which means that you can use some of those concepts in your own projects. They can be greatly beneficial to the readability and maintainability of your code.
- This article gives an introduction to
map,filterandreduce- three functional programming operations that help a lot in writing maintainable and predictable code. - This gist shows an example of using those with Bluebird, the Promises library that I recommended in the Promises Reading Guide.
- This slide deck demonstrates currying in Javascript, another functional programming technique - think of them as "partially executed functions".
Module patterns
To build "configurable" modules, you can use a pattern known as "parametric modules". This gist shows an example of that. This is another example.
A commonly used pattern is the EventEmitter - this is exactly what it sounds like; an object that emits events. It's a very simple abstraction, but helps greatly in writing loosely coupled code. This gist illustrates the object, and the full documentation can be found here.
Code architecture
The 'design' of your codebase matters a lot. Certain approaches for solving a problem work better than other approaches, and each approach has its own set of benefits and drawbacks. Picking the right approach is important - it will save you hours (or days!) of time down the line, when you are maintaining your code.
I'm still in the process of writing more about this, but so far, I've already written an article that explains the difference between monolithic and modular code and why it matters. You can read it here.
Express
If you want to build a website or web application, you'll probably find Express to be a good framework to start with. As a framework, it is very small. It only provides you with the basic necessities - everything else is a plugin.
If this sounds complicated, don't worry - things almost always work "out of the box". Simply follow the README for whichever "middleware" (Express plugin) you want to add.
To get started with Express, simply follow the below articles. Whatever you do, don't use the Express Generator - it generates confusing and bloated code. Just start from scratch and follow the guides!
- Installing Express (some of this was already covered in the NPM guide above)
- A Hello World example
- Routing
- Using template engines
- Writing Middleware
- Using Middleware
- Static File Handling (this is middleware, too!)
- Error Handling
- Debugging
To get a better handle on how to render pages server-side with Express:
- Rendering pages server-side with Express (and Pug) (a step-by-step walkthrough, work in progress)
Some more odds and ends regarding about Express:
- Some FAQs (don't use MVC, however - this is why.)
- Express Behind Proxies
- The full Express API documentation
Some examples:
- Making something "globally available" in an Express application
- Writing configurable middleware (using the same technique as the parametric modules I showed earlier)
Combining Express and Promises:
- A short article explaining how to use
express-promise-router - An example, also explaining what would happen if you didn't handle errors.
Some common Express middleware that you might want to use:
- Sessions: express-session, with connect-session-knex if you are using Knex.
- Message flashing: connect-flash
- Handling request payloads ("form/POST data"): body-parser
- Handling uploads and other multipart data: multer if you want it written to disk like PHP would do, or connect-busboy if you want to interact with the upload stream directly.
- Access logs: morgan
- OAuth/OpenID integration: Passport
Coming from other languages or platforms
- If you are used to PHP or similar: Contrary to PHP, Node.js does not use a CGI-like model (ie. "one pageload is one script"). Instead, it is a persistent process - your code is the webserver, and it handles many incoming requests at the same time, for as long as the process keeps running. This means you can have persistent state - this gist shows an example of that.
- If you are used to synchronous platforms: This gist illustrates the differences between a (synchronous) PHP script and an (asynchronous) Node.js application.
Security
Note that this advice isn't necessarily complete. It answers some of the most common questions, but your project might have special requirements or caveats. When in doubt, you can always ask in the #Node.js channel!
Also, keep in mind the golden rule of security: humans suck at repetition, regardless of their level of competence. If a mistake can be made, then it will be made. Design your systems such that they are hard to use incorrectly.
- Sessions: Use something that implements session cookies. If you're using Express, express-session will take care of this for you. Whatever you do, don't use JWT for sessions, even if many blog posts recommend it - it will cause security problems. This article goes into more detail.
- Password hashing: Use
scrypt. This wrapper module will make it easier to use. - CSRF protection: You need this if you are building a website. Use csurf.
- XSS: Every good templater will escape output by default. Only use templaters that do this (such as Jade or Nunjucks)! If you need to explicitly escape things, you should consider it insecure - it's too easy to forget to do this, and is practically guaranteed to result in vulnerabilities.
- SQL injection: Always use parameterized queries. When using MySQL, use the
node-mysql2module instead of thenode-mysqlmodule - the latter doesn't use real parameterized queries. Ideally, use something like Knex, which will also prevent many other issues, and make your queries much more readable and maintainable. - Random numbers and values: Generating unpredictable random numbers is a lot harder than it seems.
Math.random()will generate numbers that may seem random, but are actually quite predictable to an attacker. If you need random values, read this article for recommendations. It also goes into more detail about the types of "randomness" that exist. - Cryptography: Follow the suggestions in this gist. Whatever you do, do not use the
cryptomodule directly, unless you really have no other choice. Never use pure-Javascript reimplementations - always use bindings to the original implementation, where possible (in the form of native addons). - Vulnerability advisories: The Node Security Project keeps track of known vulnerabilities in Node.js modules. Services like VersionEye will e-mail you, if your project uses a module that is found vulnerable.
Useful modules:
This is an incomplete list, and I'll probably be adding stuff to it in the future.
- Determining the type of a value: type-of-is
- Date/time handling: Moment.js
- Making HTTP requests: bhttp
- Clean debugging logs: debug
- Cleaner stacktraces and errors: pretty-error
- Markdown parsing: marked
- HTML parsing: cheerio (has a jQuery-like API)
- WebSockets: ws
Deployment
- Don't run Node.js as root, ever! If you want to expose your service at a privileged port (eg. port 80), and you probably do, then you can use authbind to accomplish that safely.
Distribution
- Your project is ready for release! But... you should still pick a license. This article will give you a very basic introduction to copyright, and the different kind of (common) licenses you can use.
Scalability
Scalability is a result of your application architecture, not the technologies you pick. Be wary of anything that claims to be "scalable" - it's much more important to write loosely coupled code with small components, so that you can split out responsibilities across multiple processes and servers.
Troubleshooting
Is something not working properly? Here are some resources that might help:
- Is
npm installcausing an error? Use this error explaining tool to find out what's wrong. DeprecationWarning: Using Buffer withoutnewwill soon stop working.- the solution for this can be found here.
Optimization
The first rule of optimization is: do not optimize.
The correct order of concerns is security first, then maintainability/readability, and then performance. Optimizing performance is something that you shouldn't care about, until you have hard metrics showing you that it is needed. If you can't show a performance problem in numbers, it doesn't exist; while it is easy to optimize readable code, it's much harder to make optimized core more readable.
There is one exception to this rule: never use any methods that end with Sync - these are blocking, synchronous methods, and will block your event loop (ie. your entire application) until they have completed. They may look convenient, but they are not worth the performance penalty.
Now let's say that you are having performance issues. Here are some articles and videos to learn more about how optimization and profiling works in Node.js / V8 - they are going to be fairly in-depth, so you may want to hold off on reading these until you've gotten some practice with Node.js:
- Common causes of deoptimization
- Monomorphism, and why it is important
- Tuning Node.js
- A tour of V8: object representation
- Node.js in flames
- Realtime Node.js App: A Stress Testing Story (using Socket.IO)
- A bigger list of resources about V8 optimization and internals can be found here.
If you're seeing memory leaks, then these may be helpful articles to read:
These are some modules that you may find useful for profiling your application:
- node-inspector: Based on Chrome Developer Tools, this tool gives you many features, including CPU and heap profiling. Also useful for debugging in general. Since Node.js v6.3.0, you can also connect directly using Chrome Developer Tools.
- heapdump: On-demand heap dumps, for later analysis. Usable from application code in production, so very useful for making a heap dump the moment your application goes over a certain heap size.
- memwatch-next: Provides memory leak detection, and heap diffing.
Writing C++ addons
You'll usually want to avoid this - C++ is not a memory-safe language, so it's much safer to just write your code in Javascript. V8 is rather well-optimized, so in most cases, performance isn't a problem either. That said, sometimes - eg. when writing bindings to something else - you just have to write a native module.
These are some resources on that:
- The addon documentation
nan, an abstraction layer for making your module work across Node.js versions (you should absolutely use this)node-gyp, the build tool you will need for this purpose- V8 API documentation for every supported Node.js version
Writing Rust addons
Neon is a new project that lets you write memory-safe compiled extensions for Node.js, using Rust. It's still pretty new, but quite promising - an introduction can be found here.
Odds and ends
Some miscellaneous code snippets and examples, that I haven't written a section or article for yet.
- Named logging in Gulp: https://gist.github.com/joepie91/e7d66ffdb17d1ea69c56
- Cached image: https://gist.github.com/joepie91/cee42198b6bc6a24ea44
- Combining Gulp and Electron: https://gist.github.com/joepie91/f81cdbc1b45d52ab4b87
Future additions to this list
There are a few things that I'm currently working on documenting, that will be added to this list in the future. I write new documentation as I find the time to do so.
- Node.js for PHP developers (a migration guide) - In progress.
- A comprehensive guide to Promises - Planned.
- A comprehensive guide to streams - Planned.
- Error handling mechanisms and strategies - Planned.
- Introduction to HTTP - Planned.
- Writing a secure authentication system - Planned.
- Writing abstractions - Planned.
Node.js for PHP developers
This article was originally published at https://gist.github.com/joepie91/87c5b93a5facb4f99d7b2a65f08363db. It has not been finished yet, but still contains some useful pointers.
Learning a second language
If PHP was your first language, and this is the first time you're looking to learn another language, you may be tempted to try and "make it work like it worked in PHP". While understandable, this is a really bad idea. Different languages have fundamentally different designs, with different best practices, different syntax, and so on. The result of this is that different languages are also better for different usecases.
By trying to make one language work like the other, you get the worst of both worlds - you lose the benefits that made language one good for your usecase, and add the design flaws of language two. You should always aim to learn a language properly, including how it is commonly or optimally used. Your code is going to look and feel considerably different, and that's okay!
Over time, you will gain a better understanding of how different language designs carry different tradeoffs, and you'll be able to get the best of both worlds. This will take time, however, and you should always start by learning and using each language as it is first, to gain a full understanding of it.
One thing I explicitly recommend against, is CGI-Node - you should never, ever, ever use this. It makes a lot of grandiose claims, but it actually just reimplements some of the worst and most insecure parts of PHP in Node.js. It is also completely unnecessary - the sections below will go into more detail.
Execution model
The "execution model" of a language describes how your code is executed. In the case of a web-based application, it decides how your server goes from "a HTTP request is coming in", to "the application code is executed", to "a response has been sent".
PHP uses what we'll call the "CGI model" to run your code - for every HTTP request that comes in, the webserver (usually Apache or nginx) will look in your "document root" for a .php file with the same path and filename, and then execute that file. This means that for every new request, it effectively starts a new PHP process, with a "clean slate" as far as application state is concerned. Other than $_SESSION variables, all the variables in your PHP script are thrown away after a response is sent.
This "CGI model" is a somewhat unique execution model, and only a few technologies use it - PHP, ASP and ColdFusion are the most well-known. It's also a very fragile and limited model, that makes it easy to introduce security issues; for example, "uploading a shell" is something that's only possible because of the CGI model.
Node.js, however, uses a different model: the "long-running process" model. In this model, your code is not executed by a webserver - rather, your code is the webserver. Your application is only started once, and once it has started, it will be handling an essentially infinite amount of requests, potentially hundreds or thousands at the same time. Almost every other language uses this same model.
This also means that your application state continues to exist after a response has been sent, and this makes a lot of projects much easier to implement, because you don't need to constantly store every little thing in a database; instead, you only need to store things in your database that you actually intend to store for a long time.
Some of the advantages of the "long-running process" model (as compared to the "CGI model"):
The reason attackers cannot upload a shell, is that there is no direct mapping between a URL and a location on your filesystem. Your application is explicitly designed to only execute specific files that are a part of your application. When you try to access a .js file that somebody uploaded, it will just send the .js file; it won't be executed.
There aren't really any disadvantages - while you do have to have a Node.js process running at all times, it can be managed in the same way as any other webserver. You can also use another webserver in front of it; for example, if you want to host multiple domains on a single server.
Hosting
Node.js applications will not run in most shared hosting environments, as they are designed to only run PHP. While there are some 'managed hosting' environments like Heroku that claim to work similarly, they are usually rather expensive and not really worth the money.
When deploying a Node.js project in production, you will most likely want to host it on a VPS or a dedicated server. These are full-blown Linux systems that you have full control over, so you can run any application or database that you want. The cheapest option here is to go with an "unmanaged provider".
Unmanaged providers are providers whose responsibility ends at the server and the network - they make sure that the system is up and running, and from that point on it's your responsibility to manage your applications. Because they do not provide support for your projects, they are a lot cheaper than "managed providers".
My usual recommendations for unmanaged providers are (in no particular order): RamNode, Afterburst, SecureDragon, Hostigation and RAM Host. Another popular choice is DigitalOcean - but while their service is stable and sufficient for most people, I personally don't find the performance/resources/price ratio to be good enough. I've also heard good things about Linode, but I don't personally use them - they do, however, apparently provide limited support for your server management.
As explained in the previous section, your application is the webserver. However, there are some reasons you might still want to run a "generic" webserver in front of your application:
- Easier setup of TLS ("SSL").
- Multiple applications for different domains, on the same server ("virtual hosts").
- Slightly faster static file serving.
My recommendation for this is Caddy. While nginx is a popular and often-recommended option, it's considerably harder to set up than Caddy, especially for TLS.
Frameworks
(this section is a work in progress, these are just some notes left for myself)
- execution model
- Express
- small modules
Templating
If you've already used a templater like Smarty in PHP, here's the short version: use either Pug or Nunjucks, depending on your preference. Both auto-escape values by default, but I strongly recommend Pug - it understands the actual structure of your template, which gives you more flexibility.
If you've been using include() or require() in PHP along with inline <?php echo($foobar); ?> statements, here's the long version:
The "using-PHP-as-a-templater" approach is quite flawed - it makes it very easy to introduce security issues such as XSS by accidentally forgetting to escape something. I won't go into detail here, but suffice to say that this is a serious risk, regardless of how competent you are as a developer. Instead, you should be using a templater that auto-escapes values by default, unless you explicitly tell it not to. Pug and Nunjucks are two options in Node.js that do precisely that, and both will work with Express out of the box.
Rendering pages server-side with Express (and Pug)
This article was originally published at https://gist.github.com/joepie91/c0069ab0e0da40cc7b54b8c2203befe1.
Terminology
- View: Also called a "template", a file that contains markup (like HTML) and optionally additional instructions on how to generate snippets of HTML, such as text interpolation, loops, conditionals, includes, and so on.
- View engine: Also called a "template library" or "templater", ie. a library that implements view functionality, and potentially also a custom language for specifying it (like Pug does).
- HTML templater: A template library that's designed specifically for generating HTML. It understands document structure and thus can provide useful advanced tools like mixins, as well as more secure output escaping (since it can determine the right escaping approach from the context in which a value is used), but it also means that the templater is not useful for anything other than HTML.
- String-based templater: A template library that implements templating logic, but that has no understanding of the content it is generating - it simply concatenates together strings, potentially multiple copies of those strings with different values being used in them. These templaters offer a more limited feature set, but are more widely usable.
- Text interpolation / String interpolation: The insertion of variable values into a string of some kind. Typical examples include ES6 template strings, or this example in Pug:
Hello #{user.username}! - Locals: The variables that are passed into a template, to be used in rendering that template. These are generally specified every time you wish to render a template.
Pug is an example of a HTML templater. Nunjucks is an example of a string-based templater. React could technically be considered a HTML templater, although it's not really designed to be used primarily server-side.
View engine setup
Assuming you'll be using Pug, this is simply a matter of installing Pug...
npm install --save pug
... and then configuring Express to use it:
let app = express();

app.set("view engine", "pug");

/* ... rest of the application goes here ... */
You won't need to require() Pug anywhere, Express will do this internally.
You'll likely want to explicitly set the directory where your templates will be stored, as well:
let app = express();

app.set("view engine", "pug");
app.set("views", path.join(__dirname, "views"));

/* ... rest of the application goes here ... */
This will make Express look for your templates in the "views" directory, relative to the file in which you specified the above line.
Rendering a page
homepage.pug:
html
    body
        h1 Hello World!
        p Nothing to see here.
app.js:
router.get("/", (req, res) => {
    res.render("homepage");
});
Express will automatically add an extension to the file. That means that - with our Express configuration - the "homepage" template name in the above example will point at views/homepage.pug.
Rendering a page with locals
homepage.pug:
html
    body
        h1 Hello World!
        p Hi there, #{user.username}!
app.js:
router.get("/", (req, res) => {
    res.render("homepage", {
        user: req.user
    });
});
In this example, the #{user.username} bit is an example of string interpolation. The "locals" are just an object containing values that the template can use. Since every expression in Pug is written in JavaScript, you can pass any kind of valid JS value into the locals, including functions (that you can call from the template).
For example, we could do the following as well - although there's no good reason to do this, so this is for illustratory purposes only:
homepage.pug:
html
    body
        h1 Hello World!
        p Hi there, #{getUsername()}!
app.js:
router.get("/", (req, res) => {
    res.render("homepage", {
        getUsername: function() {
            return req.user;
        }
    });
});
Using conditionals
homepage.pug:
html
    body
        h1 Hello World!

        if user != null
            p Hi there, #{user.username}!
        else
            p Hi there, unknown person!
app.js:
router.get("/", (req, res) => {
    res.render("homepage", {
        user: req.user
    });
});
Again, the expression in the conditional is just a JS expression. All defined locals are accessible and usable as before.
Using loops
homepage.pug:
html
    body
        h1 Hello World!

        if user != null
            p Hi there, #{user.username}!
        else
            p Hi there, unknown person!

        p Have some vegetables:

        ul
            for vegetable in vegetables
                li= vegetable
app.js:
router.get("/", (req, res) => {
    res.render("homepage", {
        user: req.user,
        vegetables: [
            "carrot",
            "potato",
            "beet"
        ]
    });
});
Note that this...
li= vegetable
... is just shorthand for this:
li #{vegetable}
By default, the contents of a tag are assumed to be a string, optionally with interpolation in one or more places. By suffixing the tag name with =, you indicate that the contents of that tag should be a JavaScript expression instead.
That expression may just be a variable name as well, but it doesn't have to be - any JS expression is valid. For example, this is completely okay:
li= "foo" + "bar"
And this is completely valid as well, as long as the randomVegetable method is defined in the locals:
li= randomVegetable()
Request-wide locals
Sometimes, you want to make a variable available in every res.render for a request, no matter what route or middleware the page is being rendered from. A typical example is the user object for the current user. This can be accomplished by setting it as a property on the res.locals object.
homepage.pug:
html
    body
        h1 Hello World!

        if user != null
            p Hi there, #{user.username}!
        else
            p Hi there, unknown person!

        p Have some vegetables:

        ul
            for vegetable in vegetables
                li= vegetable
app.js:
app.use((req, res, next) => {
    res.locals.user = req.user;
    next();
});

/* ... more code goes here ... */

router.get("/", (req, res) => {
    res.render("homepage", {
        vegetables: [
            "carrot",
            "potato",
            "beet"
        ]
    });
});
Application-wide locals
Sometimes, a value even needs to be application-wide - a typical example would be the site name for a self-hosted application, or other application configuration that doesn't change for each request. This works similarly to res.locals, only now you set it on app.locals.
homepage.pug:
html
    body
        h1 Hello World, this is #{siteName}!

        if user != null
            p Hi there, #{user.username}!
        else
            p Hi there, unknown person!

        p Have some vegetables:

        ul
            for vegetable in vegetables
                li= vegetable
app.js:
app.locals.siteName = "Vegetable World";

/* ... more code goes here ... */

app.use((req, res, next) => {
    res.locals.user = req.user;
    next();
});

/* ... more code goes here ... */

router.get("/", (req, res) => {
    res.render("homepage", {
        vegetables: [
            "carrot",
            "potato",
            "beet"
        ]
    });
});
The order of specificity is as follows: app.locals are overwritten by res.locals of the same name, and res.locals are overwritten by res.render locals of the same name.
In other words: if we did something like this...
router.get("/", (req, res) => {
    res.render("homepage", {
        siteName: "Totally Not Vegetable World",
        vegetables: [
            "carrot",
            "potato",
            "beet"
        ]
    });
});
... then the homepage would show "Totally Not Vegetable World" as the website name, while every other page on the site still shows "Vegetable World".
Rendering a page after asynchronous operations
homepage.pug:
html
    body
        h1 Hello World, this is #{siteName}!

        if user != null
            p Hi there, #{user.username}!
        else
            p Hi there, unknown person!

        p Have some vegetables:

        ul
            for vegetable in vegetables
                li= vegetable
app.js:
app.locals.siteName = "Vegetable World";

/* ... more code goes here ... */

app.use((req, res, next) => {
    res.locals.user = req.user;
    next();
});

/* ... more code goes here ... */

router.get("/", (req, res) => {
    return Promise.try(() => {
        return db("vegetables").limit(3);
    }).map((row) => {
        return row.name;
    }).then((vegetables) => {
        res.render("homepage", {
            vegetables: vegetables
        });
    });
});
Basically the same as when you use res.send, only now you're using res.render.
Template inheritance in Pug
It would be very impractical if you had to define the entire site layout in every individual template - not only that, but the duplication would also result in bugs over time. To solve this problem, Pug (and most other templaters) support template inheritance. An example is below.
layout.pug:
html
    body
        h1 Hello World, this is #{siteName}!

        if user != null
            p Hi there, #{user.username}!
        else
            p Hi there, unknown person!

        block content
            p This page doesn't have any content yet.
homepage.pug:
extends layout

block content
    p Have some vegetables:

    ul
        for vegetable in vegetables
            li= vegetable
app.js:
app.locals.siteName = "Vegetable World";

/* ... more code goes here ... */

app.use((req, res, next) => {
    res.locals.user = req.user;
    next();
});

/* ... more code goes here ... */

router.get("/", (req, res) => {
    return Promise.try(() => {
        return db("vegetables").limit(3);
    }).map((row) => {
        return row.name;
    }).then((vegetables) => {
        res.render("homepage", {
            vegetables: vegetables
        });
    });
});
That's basically all there is to it. You define a block in the base template - optionally with default content, as we've done here - and then each template that "extends" (inherits from) that base template can override such blocks. Note that you never render layout.pug directly - you still render the page layouts themselves, and they just inherit from the base template.
Things of note:
- Overriding a
blockis optional. If you don't override ablock, it will simply contain either the default content from the base template (if any is specified), or no content at all (if not). - You can have an unlimited number of
blocks with different names - for example, the one in our example is calledcontent. You can decide to override any of them from a template, all of them, or none at all. It's up to you. - You can nest multiple
blocks with different names. This can be useful for more complex layout variations. - You can have multiple levels of inheritance - any template you are inheriting from can itself inherit from another template. This can be especially useful in combination with nested
blocks, for complex cases.
Static files
You'll probably also want to serve static files on your site, whether they are CSS files, images, downloads, or anything else. By default, Express ships with express.static, which does this for you.
All you need to do, is to tell Express where to look for static files. You'll usually want to put express.static at the very start of your middleware definitions, so that no time is wasted on eg. initializing sessions when a request for a static file comes in.
let app = express();

app.set("view engine", "pug");
app.set("views", path.join(__dirname, "views"));

app.use(express.static(path.join(__dirname, "public")));

/* ... rest of the application goes here ... */
Your directory structure might look like this:
your-project
|- node_modules ...
|- public
|  |- style.css
|  `- logo.png
|- views
|  |- homepage.pug
|  `- layout.pug
`- app.js
In the above example, express.static will look in the public directory for static files, relative to the app.js file. For example, if you tried to access https://your-project.com/style.css, it would send the user the contents of your-project/public/style.css.
You can optionally also specify a prefix for static files, just like for any other Express middleware:
let app = express();

app.set("view engine", "pug");
app.set("views", path.join(__dirname, "views"));

app.use("/static", express.static(path.join(__dirname, "public")));

/* ... rest of the application goes here ... */
Now, that same your-project/public/style.css can be accessed through https://your-project.com/static/style.css instead.
An example of using it in your layout.pug:
html
    head
        link(rel="stylesheet", href="/static/style.css")
    body
        h1 Hello World, this is #{siteName}!

        if user != null
            p Hi there, #{user.username}!
        else
            p Hi there, unknown person!

        block content
            p This page doesn't have any content yet.
The slash at the start of /static/style.css is important - it tells the browser to ask for it relative to the domain, as opposed to relative to the page URL.
An example of URL resolution without a leading slash:
- Page URL:
https://your-project.com/some/deeply/nested/page - Stylesheet URL:
static/style.css - Resulting stylesheet request URL:
https://your-project.com/some/deeply/nested/static/style.css
An example of URL resolution with the loading slash:
- Page URL:
https://your-project.com/some/deeply/nested/page - Stylesheet URL:
/static/style.css - Resulting stylesheet request URL:
https://your-project.com/static/style.css
That's it! You do the same thing to embed images, scripts, link to downloads, and so on.
Running a Node.js application using nvm as a systemd service
This article was originally published at https://gist.github.com/joepie91/73ce30dd258296bd24af23e9c5f761aa.
Hi there! Since this post was originally written, nvm has gained some new tools, and some people have suggested alternative (and potentially better) approaches for modern systems. Make sure to have a look at the comments on the original Gist, before following this guide!
Trickier than it seems.
1. Set up nvm
Let's assume that you've already created an unprivileged user named myapp. You should never run your Node.js applications as root!
Switch to the myapp user, and do the following:
curl -o- https://raw.githubusercontent.com/creationix/nvm/v0.31.0/install.sh | bash(however, this will immediately run the nvm installer - you probably want to just download theinstall.shmanually, and inspect it before running it)- Install the latest stable Node.js version:
nvm install stable
2. Prepare your application
Your package.json must specify a start script, that describes what to execute for your application. For example:
...
"scripts": {
    "start": "node app.js"
},
...
3. Service file
Save this as /etc/systemd/system/my-application.service:
[Unit]
Description=My Application

[Service]
EnvironmentFile=-/etc/default/my-application
ExecStart=/home/myapp/start.sh
WorkingDirectory=/home/myapp/my-application-directory
LimitNOFILE=4096
IgnoreSIGPIPE=false
KillMode=process
User=myapp

[Install]
WantedBy=multi-user.target
You'll want to change the User, Description and ExecStart/WorkingDirectory paths to reflect your application setup.
4. Startup script
Next, save this as /home/myapp/start.sh (adjusting the username in both the path and the script if necessary):
#!/bin/bash
. /home/myapp/.nvm/nvm.sh
npm start
This script is necessary, because we can't load nvm via the service file directly.
Make sure to make it executable:
chmod +x /home/myapp/start.sh5. Enable and start your service
Replace my-application with whatever you've named your service file after, running the following as root:
systemctl enable my-applicationsystemctl start my-application
To verify whether your application started successfully (don't forget to npm install your dependencies!), run:
systemctl status my-application... which will show you the last few lines of its output, whether it's currently running, and any errors that might have occurred.
Done!
Persistent state in Node.js
This article was originally published at https://gist.github.com/joepie91/bf0813626e6568e8633b.
This is an extremely simple example of how you have 'persistent state' when writing an application in Node.js. The i variable is shared across all requests, so every time the /increment route is accessed, the number is incremented and returned.
This may seem obvious, but it works quite differently from eg. PHP, where each HTTP request is effectively a 'clean slate', and you don't have persistent state. Were this written in PHP, then every request would have returned 1, rather than an incrementing number.
var i = 0;

// [...]

app.get("/increment", function(req, res) {
      i += 1;
      res.send("Current number: " + i);
})

// [...]
node-gyp requirements
This article was originally published at https://gist.github.com/joepie91/375f6d9b415213cf4394b5ba3ae266ae. It may no longer be applicable.
Linux
- Python 2.7 (not 3.x!),
build-essential(make, gcc, etc.)
Windows
- As Administrator:
npm install --global --production windows-build-tools
OS X
- Old OS X: http://osxdaily.com/2012/07/06/install-gcc-without-xcode-in-mac-os-x/
- New OS X: http://osxdaily.com/2014/02/12/install-command-line-tools-mac-os-x/
Introduction to sessions
This article was originally published at https://gist.github.com/joepie91/cf5fd6481a31477b12dc33af453f9a1d.
While a lot of Node.js guides recommend using JWT as an alternative to session cookies (sometimes even mistakenly calling it "more secure than cookies"), this is a terrible idea. JWTs are absolutely not a secure way to deal with user authentication/sessions, and this article goes into more detail about that.
Secure user authentication requires the use of session cookies.
Session data is arbitrary data that is stored on the server side, and that is associated with a session ID. The client can't see or modify this data, but the server can use the session ID from a request to associate session data with that request.
Altogether, this allows for the server to store arbitrary data for a session (that the user can't see or touch!), that it can use on every subsequent request in that session. This is how a website remembers that you've logged in.
Step-by-step, the process goes something like this:
- Client requests login page.
- Server sends login page HTML.
- Client fills in the login form, and submits it.
- Server receives the data from the login form, and verifies that the username and password are correct.
- Server creates a new session in the database, containing the ID of the user in the database, and generates a unique session ID for it (which is not the same as the user ID!)
- Server sends the session ID to the user as a cookie header, alongside a "welcome" page.
- Client receives the session ID, and saves it locally as a cookie.
- Client displays the "welcome" page that the cookie came with.
- User clicks a link on the welcome page, navigating to his "notifications" page.
- Client retrieves the session cookie from storage.
- Client requests the notifications page, sending along the session cookie (containing the session ID).
- Server receives the request.
- Server looks at the session cookie, and extract the session ID.
- Server retrieves the session data from the database, for the session ID that it received.
- Server associates the session data (containing the user ID) with the request, and passes it on to something that handles the request.
- Server request handler receives the request (containing the session data including user ID), and sends a personalized notifications page for the user with that ID.
- Client receives the personalized notifications page, and displays it.
- User clicks another link, and we go back to step 10.
Configuring sessions
Thankfully, you won't have to implement all this yourself - most of it is done for you by existing session implementations. If you're using Express, that implementation would be express-session.
The express-session module doesn't implement the actual session storage itself, it only handles the Express-related bits - for example, it ensures that req.session is automatically loaded from and saved to.
For the storage of session data, you need to specify a "session store" that's specific to the database you want to use for your session data - and when using Knex, connect-session-knex is the best option for that.
While full documentation is available in the express-session repository, this is what your express-session initialization might look like when you're using a relational database like PostgreSQL (through Knex):
const express = require("express");
const knex = require("knex");
const expressSession = require("express-session");
const KnexSessionStore = require("connect-session-knex")(expressSession);

const config = require("./config.json");

/* ... other code ... */

/* You will probably already have a line that looks something like the below.
 * You won't have to create a new Knex instance for dealing with sessions - you
 * can just use the one you already have, and the Knex initialization here is
 * purely for illustrative purposes. */
let db = knex(require("./knexfile"));

let app = express();

/* ... other app initialization code ... */

app.use(expressSession({
    secret: config.sessions.secret,
    resave: false,
    saveUninitialized: false,
    store: new KnexSessionStore({
        knex: db
    })
}));

/* ... rest of the application goes here ... */
The configuration example in more detail
require("connect-session-knex")(expressSession)The connect-session-knex module needs access to the express-session library, so instead of exporting the session store constructor directly, it exports a wrapper function. We call that wrapper function immediately after requiring the module, passing in the express-session module, and we get back a session store constructor.
app.use(expressSession({
    secret: config.sessions.secret,
    resave: false,
    saveUninitialized: false,
    store: new KnexSessionStore({
        knex: db
    })
}));
This is where we 1) create a new express-session middleware, and 2) app.use it, so that it processes every request, attaching session data where needed.
secret: config.sessions.secret,Every application should have a "secret" for sessions - essentially a secret key that will be used to cryptographically sign the session cookie, so that the user can't tamper with it. This should be a random value, and it should be stored in a configuration file. You should not store this value (or any other secret values) in the source code directly.
On Linux and OS X, a quick way to generate a securely random key is the following command: cat /dev/urandom | env LC_CTYPE=C tr -dc _A-Za-z0-9 | head -c${1:-64}
resave: false,When resave is set to true, express-session will always save the session data after every request, regardless of whether the session data was modified. This can cause race conditions, and therefore you usually don't want to do this, but with some session stores it's necessary as they don't let you reset the "expiry timer" without saving all the session data again.
connect-session-knex doesn't have this problem, and so you should set it to false, which is the safer option. If you intend to use a different session store, you should consult the express-session documentation for more details about this option.
saveUninitialized: false,If the user doesn't have a session yet, a brand new req.session object is created for them on their first request. This setting determines whether that session should be saved to the database, even if no session data was stored into it. Setting it to false makes it so that the session is only saved if it's actually used for something, and that's the setting you want here.
store: new KnexSessionStore({
    knex: db
})
This tells express-session where to store the actual session data. In the case of connect-session-knex (which is where KnexSessionStore comes from), we need to pass in an existing Knex instance, which it will then use for interacting with the sessions table. Other options can be found in the connect-session-knex documentation.
Using sessions
The usage of sessions is quite simple - you simply set properties on req.session, and you can then access those properties from other requests within the same session. For example, this is what a login route might look like (assuming you're using Knex, scrypt-for-humans, and a custom AuthenticationError created with create-error):
router.post("/login", (req, res) => {
    return Promise.try(() => {
        return db("users").where({
            username: req.body.username
        });
    }).then((users) => {
        if (users.length === 0) {
            throw new AuthenticationError("No such username exists");
        } else {
            let user = users[0];

            return Promise.try(() => {
                return scryptForHumans.verifyHash(req.body.password, user.hash);
            }).then(() => {
                /* Password was correct */
                req.session.userId = user.id;
                res.redirect("/dashboard");
            }).catch(scryptForHumans.PasswordError, (err) => {
                throw new AuthenticationError("Invalid password");
            });
        }
    });
});
And your /dashboard route might look like this:
router.get("/dashboard", (req, res) => {
    return Promise.try(() => {
        if (req.session.userId == null) {
            /* User is not logged in */
            res.redirect("/login");
        } else {
            return Promise.try(() => {
                return db("users").where({
                    id: req.session.userId
                });
            }).then((users) => {
                if (users.length === 0) {
                    /* User no longer exists */
                    req.session.destroy();
                    res.redirect("/login");
                } else {
                    res.render("dashboard", {
                        user: users[0];
                    });
                }
            });
        }
    });
});
In this example, req.session.destroy() will - like the name suggests - destroy the session, essentially returning the user to a session-less state. In practice, this means they get "logged out".
Now, if you had to do all that logic for every route that requires the user to be logged in, it would get rather unwieldy. So let's move it out into some middleware:
function requireLogin(req, res, next) {
    return Promise.try(() => {
        if (req.session.userId == null) {
            /* User is not logged in */
            res.redirect("/login");
        } else {
            return Promise.try(() => {
                return db("users").where({
                    id: req.session.userId
                });
            }).then((users) => {
                if (users.length === 0) {
                    /* User no longer exists */
                    req.session.destroy();
                    res.redirect("/login");
                } else {
                    req.user = users[0];
                    next();
                }
            });
        }
    });
}

router.get("/dashboard", requireLogin, (req, res) => {
    res.render("dashboard", {
        user: req.user
    });
});
Note the following:
- We now have a separate
requireLoginfunction that verifies whether the user is logged in. - That same function also sets
req.userif they are logged in, with their user data, before callingnext()(which passes control to the next middleware/route). - Instead of only specifying a path and a route in the
router.getcall, we now specify ourrequireLoginmiddleware as well. It will get called before the route, and the route is only ever called if therequireLoginmiddleware callsnext()(which it only does for logged-in users).
Secure random values
This article was originally published at https://gist.github.com/joepie91/7105003c3b26e65efcea63f3db82dfba.
Not all random values are created equal - for security-related code, you need a specific kind of random value.
A summary of this article, if you don't want to read the entire thing:
- Don't use
Math.random(). There are extremely few cases whereMath.random()is the right answer. Don't use it, unless you've read this entire article, and determined that it's necessary for your case. - Don't use
crypto.getRandomBytesdirectly. While it's a CSPRNG, it's easy to bias the result when 'transforming' it, such that the output becomes more predictable. - If you want to generate random tokens or API keys: Use
uuid, specifically theuuid.v4()method. Avoidnode-uuid- it's not the same package, and doesn't produce reliably secure random values. - If you want to generate random numbers in a range: Use
random-number-csprng.
You should seriously consider reading the entire article, though - it's not that long :)
Types of "random"
There exist roughly three types of "random":
- Truly random: Exactly as the name describes. True randomness, to which no pattern or algorithm applies. It's debatable whether this really exists.
- Unpredictable: Not truly random, but impossible for an attacker to predict. This is what you need for security-related code - it doesn't matter how the data is generated, as long as it can't be guessed.
- Irregular: This is what most people think of when they think of "random". An example is a game with a background of a star field, where each star is drawn in a "random" position on the screen. This isn't truly random, and it isn't even unpredictable - it just doesn't look like there's a pattern to it, visually.
Irregular data is fast to generate, but utterly worthless for security purposes - even if it doesn't seem like there's a pattern, there is almost always a way for an attacker to predict what the values are going to be. The only realistic usecase for irregular data is things that are represented visually, such as game elements or randomly generated phrases on a joke site.
Unpredictable data is a bit slower to generate, but still fast enough for most cases, and it's sufficiently hard to guess that it will be attacker-resistant. Unpredictable data is provided by what's called a CSPRNG.
Types of RNGs (Random Number Generators)
- CSPRNG: A Cryptographically Secure Pseudo-Random Number Generator. This is what produces unpredictable data that you need for security purposes.
- PRNG: A Pseudo-Random Number Generator. This is a broader category that includes CSPRNGs and generators that just return irregular values - in other words, you cannot rely on a PRNG to provide you with unpredictable values.
- RNG: A Random Number Generator. The meaning of this term depends on the context. Most people use it as an even broader category that includes PRNGs and truly random number generators.
Every random value that you need for security-related purposes (ie. anything where there exists the possibility of an "attacker"), should be generated using a CSPRNG. This includes verification tokens, reset tokens, lottery numbers, API keys, generated passwords, encryption keys, and so on, and so on.
Bias
In Node.js, the most widely available CSPRNG is the crypto.randomBytes function, but you shouldn't use this directly, as it's easy to mess up and "bias" your random values - that is, making it more likely that a specific value or set of values is picked.
A common example of this mistake is using the % modulo operator when you have less than 256 possibilities (since a single byte has 256 possible values). Doing so actually makes lower values more likely to be picked than higher values.
For example, let's say that you have 36 possible random values - 0-9 plus every lowercase letter in a-z. A naive implementation might look something like this:
let randomCharacter = randomByte % 36;That code is broken and insecure. With the code above, you essentially create the following ranges (all inclusive):
- 0-35 stays 0-35.
- 36-71 becomes 0-35.
- 72-107 becomes 0-35.
- 108-143 becomes 0-35.
- 144-179 becomes 0-35.
- 180-215 becomes 0-35.
- 216-251 becomes 0-35.
- 252-255 becomes 0-3.
If you look at the above list of ranges you'll notice that while there are 7 possible values for each randomCharacter between 4 and 35 (inclusive), there are 8 possible values for each randomCharacter between 0 and 3 (inclusive). This means that while there's a 2.64% chance of getting a value between 4 and 35 (inclusive), there's a 3.02% chance of getting a value between 0 and 3 (inclusive).
This kind of difference may look small, but it's an easy and effective way for an attacker to reduce the amount of guesses they need when bruteforcing something. And this is only one way in which you can make your random values insecure, despite them originally coming from a secure random source.
So, how do I obtain random values securely?
In Node.js:
- If you need a sequence of random bytes: Use
crypto.randomBytes. - If you need individual random numbers in a certain range: use
crypto.randomInt. - If you need a random string: You have two good options here, depending on your needs.
- Use a v4 UUID. Safe ways to generate this are
crypto.randomUUID, and theuuidlibrary (only the v4 variant!). - Use a nanoid, using the
nanoidlibrary. This also allows specifying a custom alphabet to use for your random string.
- Use a v4 UUID. Safe ways to generate this are
Both of these use a CSPRNG, and 'transform' the bytes in an unbiased (ie. secure) way.
In the browser:
- When using the Node.js options, your bundler should automatically select equivalently safe browser implementations for all of these.
- If not using a bundler:
- If you need a sequence of random bytes: Use
crypto.getRandomValueswith aUint8Array. Other array types will get you numbers in different ranges. - If you need a random string: You have two good options here, depending on your needs.
- Use a v4 UUID, with the
crypto.randomUUIDmethod. - Use a nanoid, using the standalone build of the
nanoidlibrary. This also allows specifying a custom alphabet to use for your random string.
- Use a v4 UUID, with the
- If you need a sequence of random bytes: Use
However, it is strongly recommended that you use a bundler, in general.
Checking file existence asynchronously
This article was originally published at https://gist.github.com/joepie91/bbf495e044da043de2ba.
Checking whether a file exists before doing something with it, can lead to race conditions in your application. Race conditions are extremely hard to debug and, depending on where they occur, they can lead to data loss or security holes. Using the synchronous versions will not fix this.
Generally, just do what you want to do, and handle the error if it doesn't work. This is much safer.
- If you want to check whether a file exists, before reading it: just try to open the file, and handle the
ENOENTerror when it doesn't exist. - If you want to make sure a file doesn't exist, before writing to it: open the file using an exclusive mode, eg.
wxorax, and handle the error when the file already exists. - If you want to create a directory: just try to create it, and handle the error if it already exists.
- If you want to remove a file or directory: just try to unlink the path, and handle the error if it doesn't exist.
If you're really, really sure that you need to use fs.exists or fs.stat, then you can use the example code below to do so asynchronously. If you just want to know how to promisify an asynchronous callback that doesn't follow the nodeback convention, then you can look at the example below as well.
You should almost never actually use the code below. The same applies to fs.stat (when used for checking existence). Make sure you have read the text above first!
const fs = require("fs");
const Promise = require("bluebird");

function existsAsync(path) {
  return new Promise(function(resolve, reject){
    fs.exists(path, function(exists){
      resolve(exists);
    })
  })
}
Fixing "Buffer without new" deprecation warnings
This article was originally published at https://gist.github.com/joepie91/a0848a06b4733d8c95c95236d16765aa. Newer Node.js versions no longer behave in this exact way, but the information is kept here for posterity. If you have code that still uses new Buffer, you should still update it.
If you're using Node.js, you might run into a warning like this:
DeprecationWarning: Using Buffer without `new` will soon stop working.The reason for this warning is that the Buffer creation API was changed to require the use of new. However, contrary to what the warning says, you should not use new Buffer either, for security reasons. Any usage of it must be converted as soon as possible to Buffer.from, Buffer.alloc, or Buffer.allocUnsafe, depending on what it's being used for. Not changing it could mean a security vulnerability in your code.
Where is it coming from?
Unfortunately, the warning doesn't indicate where the issue comes from. If you've verified that your own code doesn't use Buffer without new anymore, but you're still getting the warning, then you are probably using an (outdated) dependency that still uses the old API.
The following command (for Linux and Cygwin) will list all the affected modules:
grep -rP '(?<!new |[a-zA-Z])Buffer\(' node_modules | grep "\.js" | grep -Eo '^(node_modules/[^/:]+/)*' | sort | uniq -c | sort -hIf you're on OS X, your sort tool will not have the -h flag. Therefore, you'll want to run this instead (but the result won't be sorted by frequency):
grep -rP '(?<!new |[a-zA-Z])Buffer\(' node_modules | grep "\.js" | grep -Eo '^(node_modules/[^/:]+/)*' | sort | uniq -c | sortHow do I fix it?
If the issue is in your own code, this documentation will explain how to migrate. If you're targeting older Node.js versions, you may want to use the safe-buffer shim to maintain compatibility.
If the issue is in a third-party library:
- Run
npm ls <package name here>to determine where in your dependency tree it is installed, and look at the top-most dependency (that isn't your project itself) that it originates from. - If that top-most dependency is out of date, try updating the dependency first, to see if the warning goes away.
- If the dependency is up-to-date, that means it's an unfixed issue in the dependency. You should create an issue ticket (or, even better, a pull request) on the dependency's repository, asking for it to be fixed.
Why you shouldn't use Sails.js
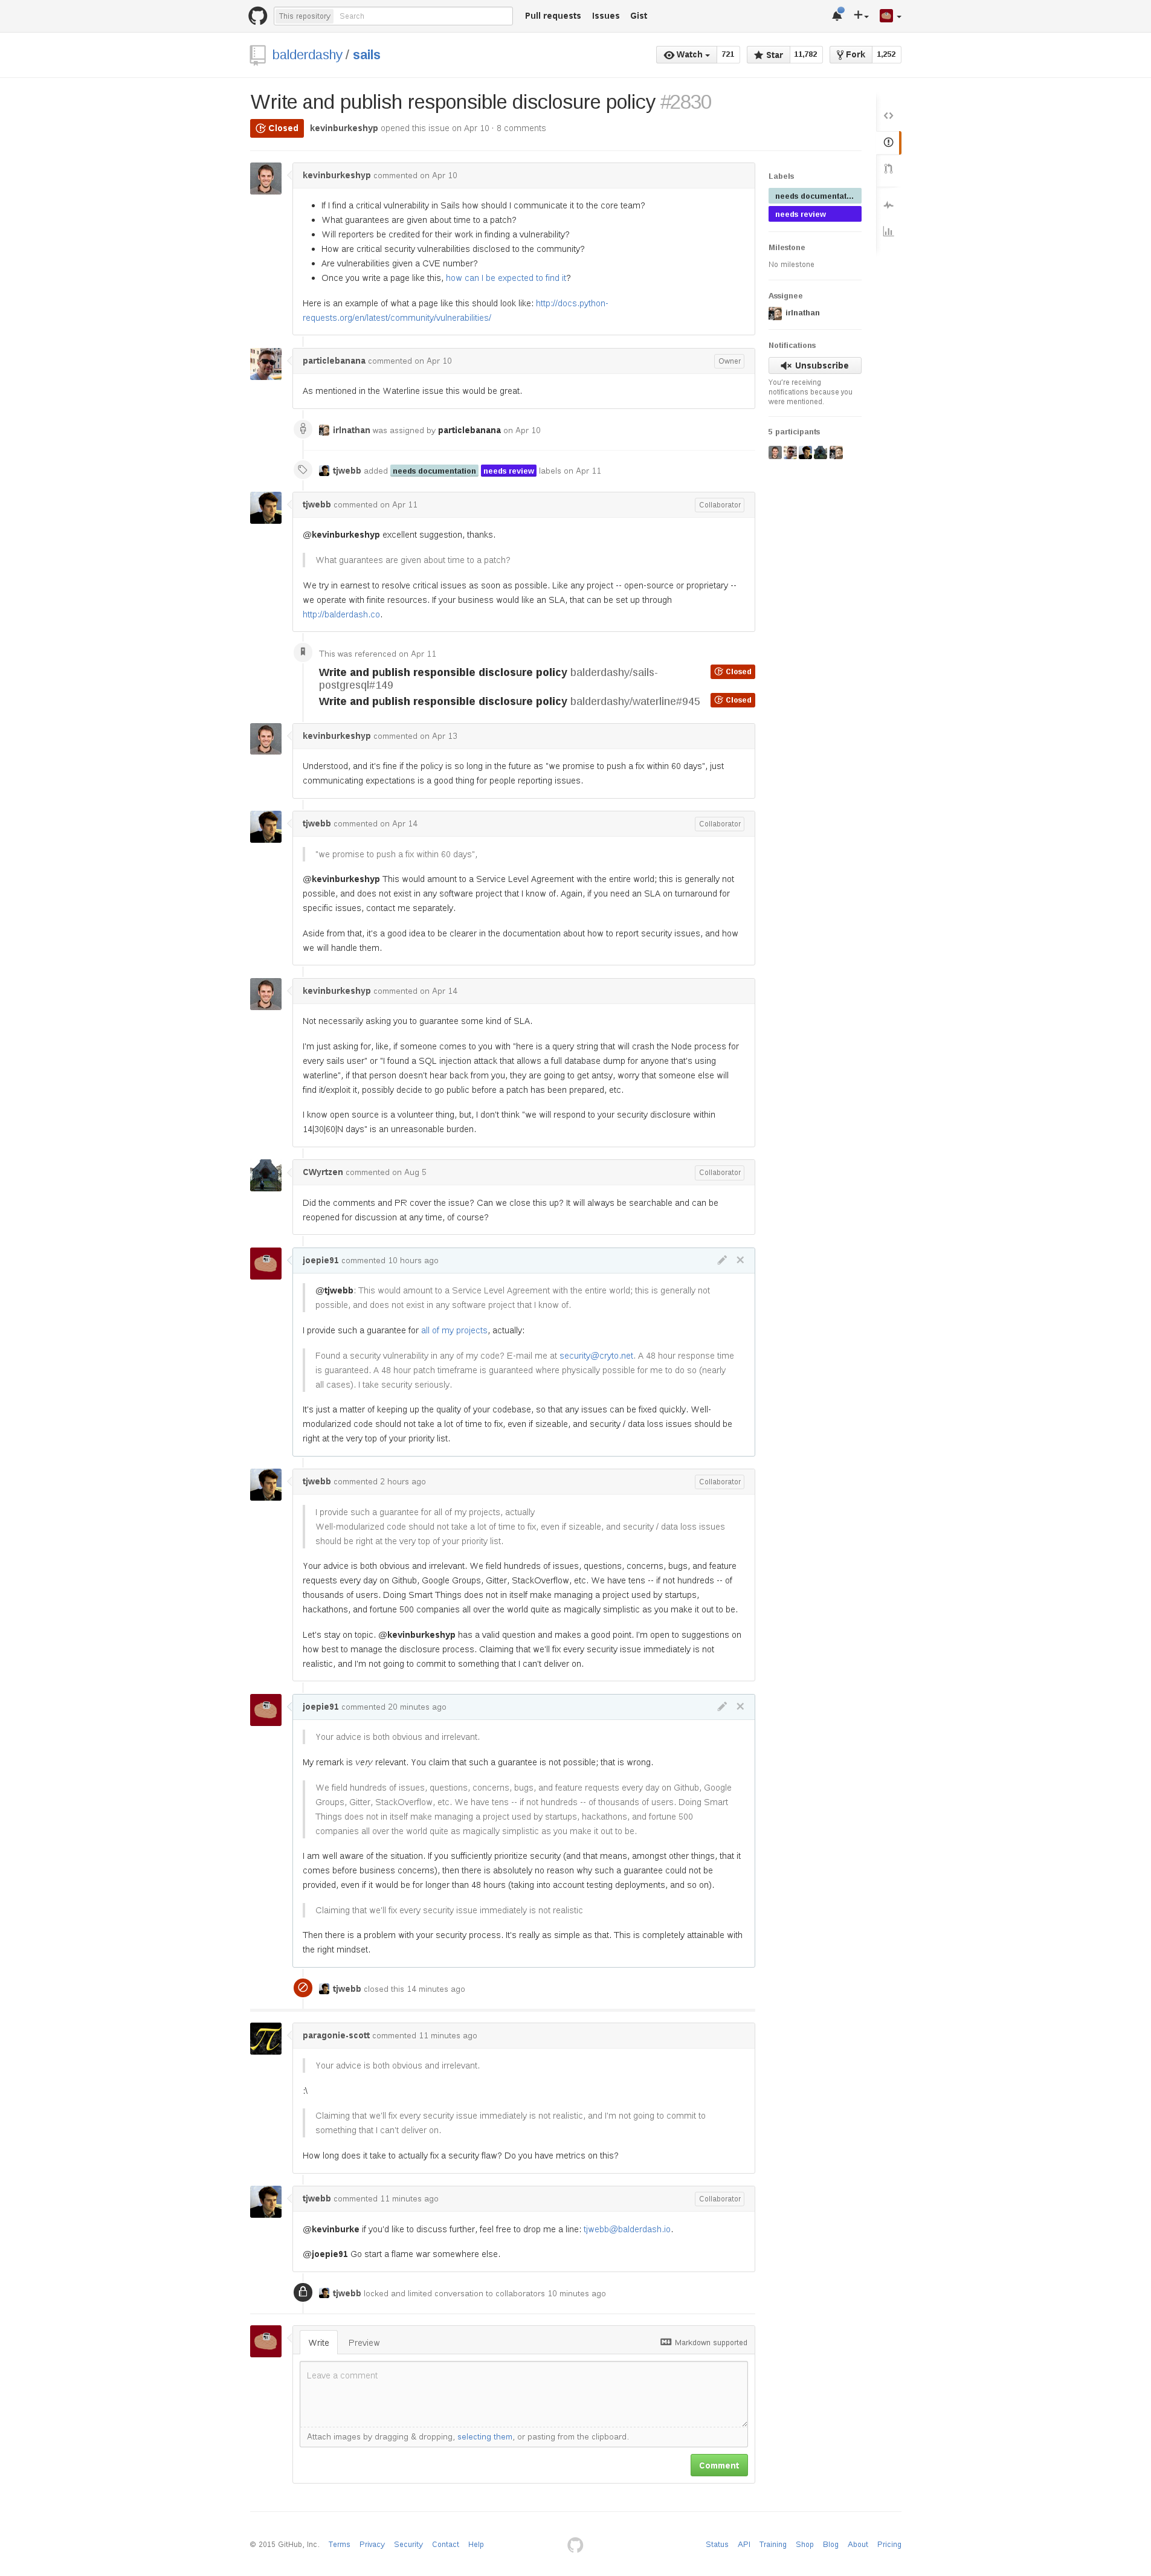
This article was originally published at https://gist.github.com/joepie91/cc8b0c9723cc2164660e.
This article was published in 2015. Since then, the situation may have changed, and this article is kept for posterity. You should verify whether the issues still apply when making a decision
A large list of reasons why to avoid Sails.js and Waterline: https://kev.inburke.com/kevin/dont-use-sails-or-waterline/
Furthermore, the CEO of Balderdash, the company behind Sails.js, stated the following:
"we promise to push a fix within 60 days",
@kevinburkeshyp This would amount to a Service Level Agreement with the entire world; this is generally not possible, and does not exist in any software project that I know of.
Upon notifying him in the thread that I actually offer exactly that guarantee, and that his statement was thus incorrect, he accused me of "starting a flamewar", and proceeded to delete my posts.
UPDATE: The issue has been reopened by the founder of Balderdash. Mind that this article was written back when this was not the case yet, and judge appropriately.
He is apparently also unaware that Google Project Zero expects the exact same - a hard deadline of 90 days, after which an issue is publicly disclosed.
Now, just locking the thread would have been at least somewhat justifiable - he might have legitimately misconstrued my statement as inciting a flamewar.
What is not excusable, however, is removing my posts that show his (negligent) statement is wrong. This raises serious questions about what the Sails maintainers consider more important: their reputation, or the actual security of their users.
It would have been perfectly possible to just leave the posts intact - the thread would be locked, so a flamewar would not have been a possibility, and each reader could make up their own mind about the state of things.
In short: Avoid Sails.js. They do not have your best interests at heart, and this could result in serious security issues for your project.
For reference, the full thread is below, pre-deletion.
Building desktop applications with Node.js
Option 1: Electron
This is the most popular and well-supported option. Electron is a combination of Node.js and Chromium Embedded Framework, and so it will give you access to the feature sets of both. The main tradeoff is that it doesn't give you much direct control over the window or the system integration.
Benefits
- Cross-platform
- Well-supported, with a large developer base and a lot of (third-party) documentation
- Works pretty much out of the box, and lets you use HTML and CSS
- Can use native Node.js modules
Drawbacks
- Relatively high baseline memory usage; expect 50-100MB of RAM before running any application code. This is fine for most applications, but probably not for tiny utilities.
- Somewhat restrictive; does not give you much control over the system integration, instead has a default setup that's okay for most purposes and abstracts away platform-specific things for the most part.
- Limited OpenGL support; only WebGL is available.
Option 2: SDL
Using https://www.npmjs.com/package/@kmamal/sdl and https://www.npmjs.com/package/@kmamal/gl, you can use SDL and OpenGL directly from Node.js. This will take care of window creation, input handling, and so on - but you will have to do all the drawing yourself using shaders.
A full (low-level) example is available here, and you can also use regl to simplify things a bit.
For text rendering, you may wish to use Pango or Harfbuzz, which can both be used through the node-gtk library (which, despite the name, is a generic GObject Introspection library rather than anything specific to the GTK UI toolkit).
Benefits
- Direct OpenGL access
- Does not enforce any particular structure on your project
- Good selection of examples
Drawbacks
- You have to do all of the drawing yourself; there are no widgets, there is no CSS, and so on. You will be writing OpenGL shaders. There is support for canvas-style drawing, but it is not fast.
- More research required to understand how to use it; not a lot of people use these libraries, and there are not very many tutorials.
Option 3: FFI bindings
You can also use an existing UI library that's written in C, C++ or Rust, by using a generic FFI library that lets you call the necessary functions from Javascript code in Node.js directly.
For C, a good option is Koffi, which has excellent documentation. For Rust, a good option is Neon, whose documentation is not quite as extensive as that of Koffi, but still pretty okay.
Option 4: GTK
The aforementioned node-gtk library can also be used to use GTK directly. Very little documentation is available about this, so you'll likely be stuck reading the GTK documentation (for its C API) and mentally translating to what the equivalent in the bindings would be.
lmdb-js Quick Reference
Abbreviated documentation for https://www.npmjs.com/package/lmdb, for easier reference once you already understand how the library works.
"use strict";

const lmdb = require("lmdb");

// recommended write strategy: conditional writes

// if path contains . it's a file, otherwise it's a directory, or if null it's in-memory
let db = lmdb.open({ path: "/path/to/db", ... options, ... rootOptions }); // root database
let subDB = db.openDB("sub-db name", ... options);

let options = {
	compression: boolean || { threshold: integer, dictionary: Buffer },
	useVersions: boolean, // entries have version numbers
	sharedStructuresKey: Symbol, // stores values more efficiently by having a central key/structure mapping
	encoding: "msgpack" (default) || "json" || "cbor" || "string" || "ordered-binary" || "binary",
	encoder: object_settings || msgpack: { structuredClone, useFloat32 } || { encode: Function, decode: Function },
	cache: boolean || object_weakLRUCacheSettings, // if enabled, child transactions and rollbacks will not be available
	keyEncoding: "uint32" || "binary" || "ordered-binary" (default),
	keyEncoder: Function,
	dupSort: boolean, // keys have multiple values; use encoding=ordered-binary and getValues(), ifVersion will not be available
	strictAsyncOrder: boolean
};

let rootOptions = {
	path: string,
	maxDbs: integer, // default: 12
	maxReaders: integer,
	overlappingSync: boolean,
	separateFlushed: boolean,
	pageSize: integer, // set 4096 (default) for fits-in-memory, 8192 for larger especially for range queries
	eventTurnBatching: boolean, // default: true
	txnStartThreshold: integer, // only relevant when eventTurnBatching=false
	encryptionKey: Buffer || string, // 32 bytes
	commitDelay: integer, // in ms
};

// Existence (always synchronous)
let exists = db.doesExist(key);
let exists = db.doesExist(key, version); // for single-value
let exists = db.doesExist(key, value); // for multi-value

// Reads (always synchronous)
let value = db.get(key, options); // value = undefined || single value
let entry = db.getEntry(key, options); // for single-value; entry = undefined || { value, version }
let iterator = db.getValues(key); // for multi-value; iterator<value> (see range/search for special forms)
let version = db.getLastVersion(); // version = integer; version of last `get` call. not available when `cache` is enabled

// Specialized reads
let values = await db.getMany(keys); // optimized db.get that prefetches first to not block main thread
let valueEncoded = db.getBinary(key); // skip value decode

// Range/search (always synchronous)
let iterator = db.getRange(rangeOptions); // iterator<{ key, value }>, has lazy and optionally async map/filter/forEach
let iterator = db.getKeys(rangeOptions); // iterator<value>; key only returned once for multi-value entries
let iterator = db.getValues(key, rangeOptions); // for multi-value; returns all values for a key (start/end affect values, not keys)

let rangeOptions = {
	start: value,
	end: value,
	reverse: boolean,
	offset: integer,
	limit: integer,
	asArray: boolean // greedy!
};

// Mutations
let success = await db.put(key, value, version, ifVersion); // success = true if stored, false on ifVersion mismatch
let success = await db.remove(key, ifVersion); // for single-value; success = true if deleted, false on ifVersion mismatch
let success = await db.remove(key, value); // for multi-value; success = true if value deleted

// Conditionals
let success = await db.ifVersion(key, ifVersion, () => { ... });
let success = await db.ifNoExists(key, () => { ... });

// Synchronous versions of mutations
let success = db.putSync(key, value, options); // SLOW; versionOrOptions = { append, appendDup, noOverwrite, noDupData, version }
let success = db.removeSync(key, value); // SLOW
let success = db.removeSync(key, ifVersion); // SLOW

// Database-wide mutations
await db.clearAsync(); // removes all entries
db.clearSync(); // same but synchronous
await db.dropAsync(); // remove all entries *and* deletes the database
db.dropSync(); // same but synchronous

// Utilities
lmdb.asBinary(buffer); // Mark buffer as 'already encoded' (stored as-is) rather than literal buffer (which gets type-tagged)
await db.committed; // Wait for all currently pending writes to be committed to the database (in memory)
await db.flushed; // Wait for all currently pending writes to be flushed to disk
await db.prefetch(keys); // Preload specified keys into memory
await db.backup(path); // Stores an internally consistent copy of the database at the specified path
db.on("beforecommit", () => { /* ... */ }); // Fires just before commit to disk, allows async ops, forces eventTurnBatching on

// Transactions
// A transaction callback is called at some later time when processing database operations, and a single database commit may
//  also contain operations from outside of the transaction, in addition to the transaction. The return value gets passed through.
let returnValue = await db.transaction(() => { /* ... series of DB operations here ... */ });

// Child transactions can be used to support rollbacks; if something throws within one, the changes are rolled back and the
//  transaction will be aborted. Because transaction management is synchronously stateful, no reference to the parent transaction
//  is needed. It's also possible to create a child transaction *outside of* any parent transaction, in which case it will be rolled
//  into a default(?) transaction on the next commit.
let returnValue = await db.childTransaction(() => { /* ... series of DB operations here ... */ });

// Asynchronous transaction callbacks are *possible* but since transaction management is stateful, this can result in unrelated
//  operations unexpectedly ending up in a transaction that they don't belong to. So normally you *shouldn't* await inside of a
//  transaction, even though you would use the asynchronous versions of operations. Instead of checking for failure asynchronously,
//  rely on the transaction abort/rollback.

// There is a synchronous transaction equivalent, which doesn't batch? and executes immediately
let returnValue = db.transactionSync(() => { /* ... series of DB operations here ... */ });

// And there are also read transactions, providing a consistent view to read from
let transaction = db.useReadTransaction();
/* ... read-only operations go here ... */
transaction.done(); // Do not forget! Or it will leak
Fixing node: prefixed requires/imports in Browserify
If you're running into issues with Browserify and prefixed module names (like in require("node:fs")), and you cannot change the imports because eg. they exist within a third-party module, then this workaround will fix that.
This doesn't work for newer core modules like node:test, which are only possible to require using the prefix; it only works for core modules that allow importing both with and without the prefix.
You can use browserify-replace to automatically replace every occurrence of the prefix in every module; you need to ensure that this comes before any other transform, including before things like Babel.
For example:
	app.use("/bundle.js", watchifyMiddleware(browserify("src/ui/index.jsx", {
		basedir: __dirname,
		debug: true,
		cache: {},
		extensions: [".jsx"],
		transform: [
			["browserify-replace", {
				global: true,
				replace: [
					{ from: '"node:([a-z_-]+)"', to: '"$1"' },
					{ from: "'node:([a-z_-]+)'", to: "'$1'" },
				]
			}],
			["babelify", {
				presets: ["@babel/preset-env", "@babel/preset-react"],
			}],
		]
	})));
The browserify-replace transform is what makes it work; the global flag is what makes it work for everything within node_modules too. The rest of the example is not relevant to make it work, this code is just taken from a project of mine.
What it does is do a string-replace to strip the prefix off everything that it finds. Because it's a string replace, it doesn't need to go through any (language-aware) processing steps that might stumble over the unsupported import path, so this should work for eg. JSX and Typescript as well.
It's still a hack and it'll match any string that has this format, so I wouldn't recommend relying on this in the long term, and I'd suggest looking into a better-maintained bundler like Parcel nowadays. But to keep things running in the short term, this should suffice.